 Quail Corner

Best Heat Lamp for Quail Brooder (2026): 8 Picks for Coturnix Chicks
The best heat lamp for quail brooder setups is the LUCKY HERP 100W Ceramic Heat Emitter, 2-pack, for most small Coturnix batches. It gives no visible light and includes a spare bulb, though you must supply a compatible ceramic-socket fixture.
A lamp is only one part of the system. Week-one Coturnix chicks need 95°F / 35°C at chick level, a cooler escape area, secure mounting, and a temperature check where the chicks actually stand.
Quick picks for a safer brooder
Ranked by no-light comfort, replacement value, fixture fit, and practical safety.
Overall
Best no-light heat for most small brooders
- 100W ceramic emitter
- No visible light
- Standard E26 base
- Two bulbs for a spare
Top Pick LUCKY HERP 100W Ceramic Heat Emitter
$
Buy the bulb, then pair it with a ceramic-socket fixture.
Check Price on Amazon Budget
Low-cost replacement coverage
- 100W ceramic emitters
- No visible light
- Two-pack
- One-year warranty listed
Top Pick Simple Deluxe 100W Ceramic Emitters
$
A sensible spare set for a fixture you already own.
Check Price on Amazon Fixture
The missing half of a bulb-only setup
- Ceramic socket
- 150W maximum bulb load
- UL/CUL approved
- On/off switch
Top Pick Fluker's Repta-Clamp Lamp 8.5-inch
$
A compatible holder for ceramic emitters up to its listed limit.
Check Price on AmazonQuick answer: Buy the LUCKY HERP 100W Ceramic Heat Emitter for no-light warmth and a spare. Pick Simple Deluxe for inexpensive replacement coverage, Fluker’s Repta-Clamp for the fixture, or the LUCKY HERP red bulb when visible red light suits your setup. Product wattage is a listing specification, not a universal brooder setting.
Quick picks
Our Top Picks


Comparison table
| Product | Best for | Price band | Key spec | Verdict | Link |
|---|---|---|---|---|---|
| LUCKY HERP 100W Ceramic Heat Emitter | Small indoor brooders needing no-light heat and a spare bulb | $ | 100W | Best Overall | Check current price |
| Simple Deluxe 100W Ceramic Emitters | Low-cost replacement coverage for a compatible brooder fixture | $ | 100W each | Best Budget | Check current price |
| Fluker's 150W Ceramic Heat Emitter | Larger or cooler brooder spaces where a higher-output bulb is appropriate | $$ | 150W | Higher Output | Check current price |
| OMAYKEY 100W Ceramic Heat Emitter | Keepers who want a clearly stated porcelain-socket requirement and two bulbs | $ | 100W | Porcelain-Socket Pick | Check current price |
| Zoo Med ReptiCare 100W Emitters | Buyers prioritizing a flat-faced, established-brand two-pack | $$$ | 100W each | Premium Pair | Check current price |
| LUCKY HERP 250W Red Infrared Bulb | Cold or larger setups where visible red infrared light is specifically wanted | $ | 250W | Best Red Bulb | Check current price |
| Fluker's Repta-Clamp Lamp 8.5-inch | A compatible, ceramic-socket fixture for a bulb-only brooder setup | $ | Ceramic | Best Fixture | Check current price |
| BONGBADA 125W Red Heat Bulbs | Keepers who want two red infrared replacement bulbs | $ | 125W each | Red-Bulb Value | Check current price |
How we evaluate
Heat output comes after fit and control. We look for a clearly stated socket, voltage or load, light type, and product form. A bulb needs a fixture. A fixture needs secure support. Mixing those jobs is how first brooders end up with a bulb that cannot be safely mounted.
The useful question is what the chicks experience at floor level. We weigh the 95°F / 35°C week-one target, a usable heat gradient, and the practical downside of each choice. Myshire Farm discusses lamp advantages and lower-fire-risk alternatives. Meyer Hatchery warns about cardboard and heat-lamp fire risk. Stromberg’s guidance stresses secure mounting and avoiding concentrated hot spots.
For temperature checks, Best brooder thermometer for quail (2026): 7 picks can help you choose a probe or display for chick-level monitoring. You will also need safe water, so see Best Quail Chick Waterer (2026): 7 Safe Picks before the chicks arrive.
Individual product reviews
1) LUCKY HERP 100W Ceramic Heat Emitter
The LUCKY HERP emitter is our overall pick for a small indoor Coturnix brooder. The listing specifies ceramic construction, 120V power, a standard E26 base, and no visible light. The two-pack leaves you a spare when you need it.
This is an emitter, not a complete lamp. Pair it with a ceramic-socket fixture and independent support. Its no-light design suits a dark night setup, though the hot surface still needs careful mounting.
Pros
- ✓ No visible light
- ✓ Two-pack includes a spare
- ✓ Standard E26 base
Cons
- ✗ Bulb only
- ✗ Needs a compatible ceramic-socket fixture
2) Simple Deluxe 100W Ceramic Emitters
Simple Deluxe makes sense when you already have a suitable holder and want inexpensive replacement coverage. The listing specifies 100W ceramic emitters, no visible light, an E26 base, AC 110–120V, and a one-year warranty.
The budget price band does not prove longer life or better heat control. Check the socket and measure chick-level heat after installation. If the holder cannot be supported safely, fix that part first.
Pros
- ✓ Two-pack replacement coverage
- ✓ No visible light
- ✓ One-year warranty listed
Cons
- ✗ Bulbs only
- ✗ Wattage does not control temperature by itself
3) Fluker's 150W Ceramic Heat Emitter
Fluker’s 150W emitter is the higher-output ceramic option here. Its listing describes natural infrared heat, a large circular shape, and compatibility with the Repta-Clamp Lamp with Switch. It suits a larger or cooler space only when the thermometer says you need more heat.
Higher output can overheat a small box. Position the fixture so chicks have a cooler side, match the holder to the load, and keep a spare plan because this is a single bulb. The wattage is a product specification, not a target for every brooder.
Pros
- ✓ Higher listed output
- ✓ No visible light
- ✓ Compatible with the Repta-Clamp Lamp with Switch
Cons
- ✗ Single bulb
- ✗ Can overheat a small brooder
4) OMAYKEY 100W Ceramic Heat Emitter

OMAYKEY offers two 100W ceramic emitters with no visible light. The listing specifies a standard porcelain E26 socket, lists AC 90–120V, and identifies the item as ETL Listed. That stated socket detail gives a new keeper something concrete to check before buying a holder.
This remains bulb-only. Check that the emitter fits the reflector without crowding it, then measure at chick level. Two products with the same printed wattage can behave differently in different boxes.
Pros
- ✓ Two-pack
- ✓ No visible light
- ✓ ETL Listed
Cons
- ✗ Bulbs only
- ✗ Needs a correctly matched reflector and socket
5) Zoo Med ReptiCare 100W Emitters

Zoo Med’s pair suits buyers who want a flat-faced emitter and a product listed for high humidity. The listing specifies 100W each, no visible light, and a 30–40 gallon terrarium size. That last figure is product context, not a quail prescription.
The premium price band earns its place only if the shape or pair solves a real problem. You still need a ceramic socket, secure support, and nonflammable surroundings.
Pros
- ✓ Flat-faced design
- ✓ Two-pack
- ✓ No visible light
Cons
- ✗ Bulbs only
- ✗ Premium price band needs a specific reason
6) LUCKY HERP 250W Red Infrared Bulb

The LUCKY HERP red bulb is the deliberate visible-light choice. Its listing specifies a 250W glass bulb, soft red light, a standard E26 base, and 120V power. Choose it only when red light and a larger or colder setup fit your plan.
The listing warns against dimmers, thermostats, and rheostats. Match the fixture carefully. This is a poor default for a small brooder, where 250W can overwhelm the warm zone. Choose a ceramic emitter if a dark rest period matters more than visible red light.
Pros
- ✓ Visible soft red light
- ✓ Standard E26 base
- ✓ 120V listing
Cons
- ✗ 250W can be too much for a small brooder
- ✗ Listing warns against dimmers, thermostats, and rheostats
7) Fluker's Repta-Clamp Lamp 8.5-inch
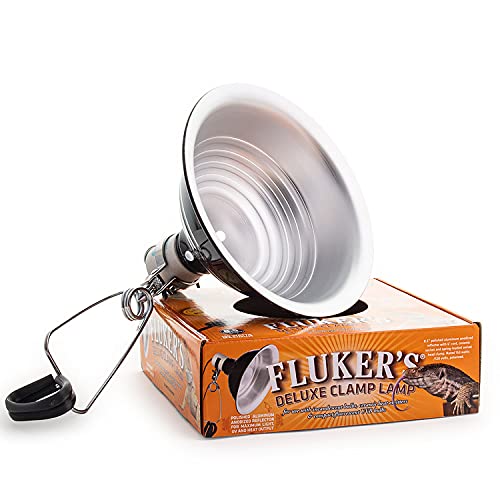
Fluker’s Repta-Clamp solves the fixture half of the setup. The listing specifies a ceramic socket, 150W maximum bulb load, UL/CUL approval, an on/off switch, and heavy-gauge painted aluminum. It is a holder and reflector, not a heat source.
A clamp should not be the only support above bedding. Secure it independently, match the bulb to the fixture, and verify the warm zone with a probe at chick height.
Pros
- ✓ Ceramic socket
- ✓ On/off switch
- ✓ Clear 150W load limit
Cons
- ✗ Fixture only
- ✗ Clamp still needs independent support
8) BONGBADA 125W Red Heat Bulbs
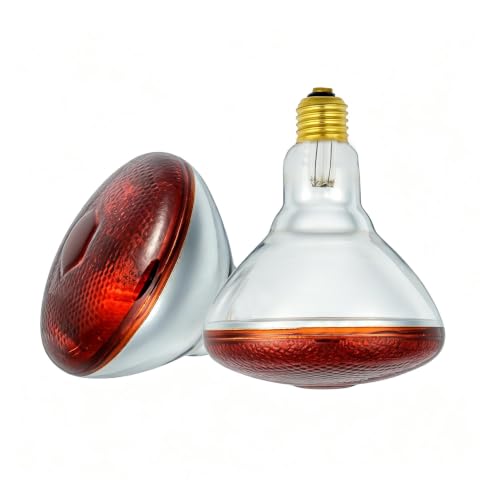
BONGBADA gives red-light buyers two 125W glass bulbs with E26 bases and 120V power. It fits a keeper who already has a correctly matched fixture and wants a spare red bulb ready.
The listing says estimated life up to 5,000 hours, so treat that as a product claim rather than a promise. Red light does not replace a temperature check, and this option is unsuitable for a no-light setup.
Pros
- ✓ Two-pack
- ✓ Red infrared light
- ✓ Standard E26 base
Cons
- ✗ Glass bulbs
- ✗ Estimated life is a listing claim, not a promise
Frequently asked questions
What is the best heat lamp for quail brooder?
The LUCKY HERP 100W Ceramic Heat Emitter is our overall pick for a small Coturnix brooder. It emits no visible light and comes as a two-pack, so you have a spare. It is a bulb only, so add a compatible ceramic-socket fixture and independent support.
What is the best quail heat lamp?
Choose a ceramic emitter for heat without a visible night light. Choose the LUCKY HERP 250W Red Infrared Bulb when you specifically want soft red light for a larger or colder setup. The fixture, mounting, and chick-level temperature reading decide the result.
What is the best brooder lamp for quail?
The best brooder lamp is a ceramic-socket fixture matched to the bulb and its load. Fluker’s Repta-Clamp lists a ceramic socket and 150W maximum bulb load, yet it does not include a heat source. Mount it securely over nonflammable surroundings.
What is the best heat lamp for quail chicks?
Start with 95°F / 35°C at chick level during week one, then read the brooder instead of shopping by wattage alone. The 100W emitter is a useful starting product for many small indoor setups, while room temperature, enclosure size, height, and airflow change the result.
How long do quail chicks need a heat lamp?
Reduce the target by about 5°F per week. Coturnix chicks generally leave supplemental heat at 3–4 weeks in warm weather when fully feathered. Colder rooms can change the timing, so watch behavior and check temperatures.
Are ceramic heat emitters safe for quail chicks?
They can be used safely with a ceramic-socket fixture, secure independent support, nonflammable surroundings, and regular checks. The emitter stays very hot and produces no visible light, so chicks still need a cooler area and a chick-level thermometer.
Related guides
- Best brooder thermometer for quail (2026): 7 picks for chick-level checks.
- Best Quail Chick Waterer (2026): 7 Safe Picks for safer brooder water.
- Best Quail Starter Feed (2026): 7 Picks for young Coturnix feed.
- How to Build a Quail Brooder Box (2026) for a simple box plan.