 Quail Corner

Quail Chicks Slipping on Brooder Floor: 5 Fixes (2026)
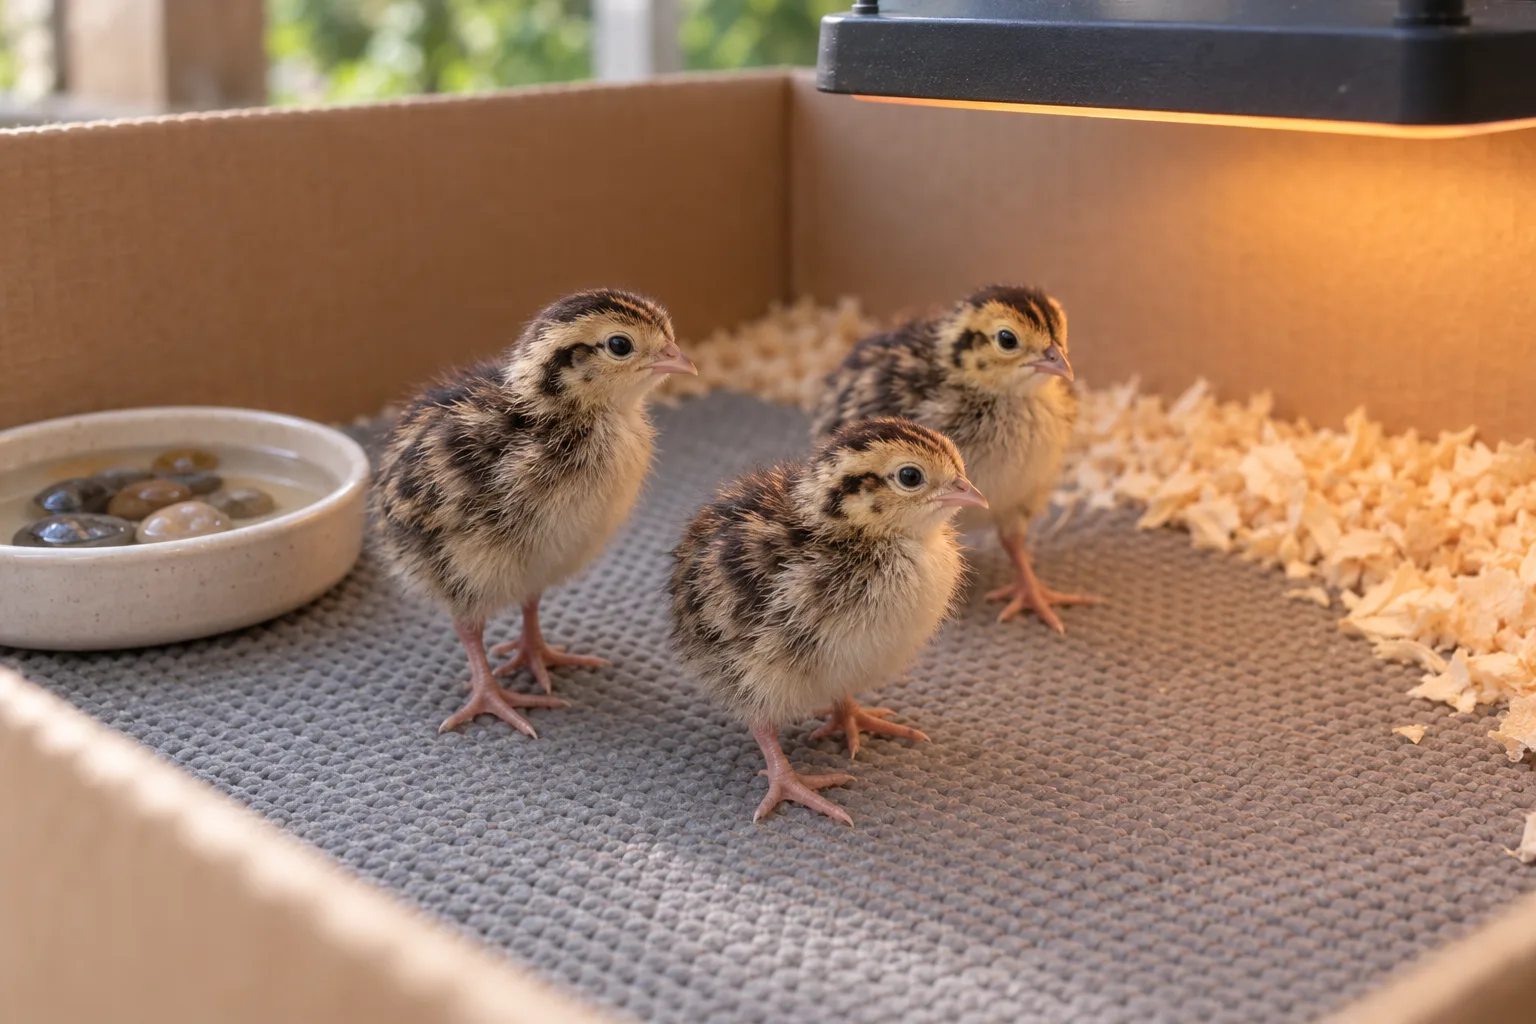
Quail chicks slipping on a brooder floor need a traction fix first: remove the smooth or damp layer and replace it with a clean, dry, secure surface. For most keepers, the Hatching Time Brooder Floor Mat 6-Pack is the practical default because six washable mats make rotation simple.
A mat is flooring only. It does not supply heat or make a brooder safe by itself. For product-level comparisons of washable, cut-to-fit, disposable, and household liner options, see Best Brooder Mat for Quail Chicks (2026): 7 Picks.
Stop Quail Chicks Slipping on the Brooder Floor
A repeatable 5-step traction fix
Step 1 Prepare a clean swap
- Cut and wash the replacement
- Set a dry towel nearby
Step 2 Move chicks briefly
- Use a warm holding box
- Keep the move short
Step 3 Check the base
- Remove loose layers
- Inspect for moisture
Step 4 Lay flooring flat
- Fit every edge
- Keep adhesive away
Step 5 Watch their footing
- Observe walking and resting
- Recheck after watering
Result
A dry, secure brooder floor that gives chicks traction while the heat source and cooler retreat remain available.
Why are quail chicks slipping on the brooder floor?
Slipping usually comes from a smooth floor, wet paper, or a liner that moves under their feet. Give the chicks a dry, flat surface with texture, then check the edges after they walk and after the waterer is refilled. Penn State Extension's “Brooding of Domestic Fowl” also warns against smooth floors for young birds.
What is the safest temporary and washable surface?
Use clean paper towel for the short emergency swap. For repeated use, choose a washable textured mat fitted to the base, then keep a spare drying. Both options need a flat, dry floor.
The Hatching Time mat is the easiest default for repeated cleaning. Its six perforated polypropylene mats measure 17.25 x 11.38 inches each, and the six-mat pack lets you replace a damp mat while another dries.
A keeper discussion in Backyard Chickens' “Help! Quail hatch day with slippery floor!” describes paper towel as an immediate traction layer. That is useful keeper experience for a quick swap, not a substitute for a secure, washable floor.
What you'll need
- A clean replacement mat, liner, or several layers of paper towel for temporary use
- A warm, secure holding box for the chicks during the brief floor swap
- Mild soap, clean water, and a fully dry towel for washable flooring
- Scissors for a cut-to-fit liner, with no exposed adhesive left behind
For a large or irregular brooder, the CVUTOVO Silicone Brooder Liner 2-Pack is the cut-to-fit option. For a household alternative, Duck EasyLiner Select Grip can work only when cut neatly and kept flat. Duck is a household shelf liner, not purpose-built poultry equipment.
Our Top Picks


How to replace a slippery brooder floor without chilling chicks
Step 1: Prepare the clean replacement
Wash a reusable mat with mild soap and water, rinse it, and dry it fully. If you are using paper towel as a temporary fix, cut enough pieces to cover the base without seams lifting. Measure the footprint before cutting a liner. The guide How Big Should a Quail Brooder Be? A Sizing Guide (2026) covers batch sizing and footprint planning before you trim material.
Step 2: Move the chicks briefly
Place the chicks in a small secure holding box in a warm part of the room. Keep the transfer short and handle them gently. You are buying a few minutes to fix the floor, not setting up a second brooder.
Step 3: Remove the unsafe surface
Take out slick plastic, wet paper, loose bedding, and any liner with curled corners. Wipe the base clean and look for spilled water. A damp layer can turn a textured mat slippery, so do not lay the new surface over it.
Step 4: Check the base and lay the new surface flat
The replacement must sit on a firm, level base with no folds. Press it into the corners and trim it so edges cannot curl upward. Never use adhesive where chicks can reach it. If wire is part of the setup, chicks need ¼-inch floor wire, and the mat still needs to sit securely over the intended floor area.
For practical advice on a secure brooder floor, ventilation, and equipment placement, see How to Build a Quail Brooder Box (2026). The mat supports footing; it does not fix an unsafe box.
Step 5: Return the chicks and observe
Return the chicks and watch them walk, stand, eat, and rest. Check that the heat source is working and that they can move to a comfortable cooler retreat. Reduce brooder temperature by about 5 °F per week later, and move fully feathered chicks out at 3–4 weeks. Keep those heat checks separate from the flooring decision.
Common mistakes that keep chicks slipping
- Leaving a wet floor in place. Refill the waterer carefully and change damp flooring promptly.
- Stacking loose layers. Multiple unfixed sheets create ridges and movement. Use one fitted surface.
- Ignoring curled edges. Trim the liner or replace it when corners lift.
- Leaving adhesive exposed. Use non-adhesive material only, with no sticky backing within reach.
- Blocking the cooler retreat. Place flooring and equipment so chicks can leave the warm area.
- Expecting the mat to provide heat. Keep the heat source, temperature check, and floor as separate parts of the setup.
How do you fix recurring slipping on a brooder floor?
Recurring slipping means you need to identify the surface failure instead of adding more layers. Check moisture, movement, fit, and damage in that order. A clean, flat, secure surface should stay underfoot after the chicks walk across it and after the waterer is used.
How do you check heat and a cooler retreat?
During week one, aim for 95 °F / 35 °C at chick level under the heat source. Leave open floor away from it so chicks can move out when they feel warm. The mat improves footing; it does not set the brooder temperature.
What if moisture makes the floor slippery?
Dry the base and replace wet paper or a soaked liner. Move the waterer away from the warmest resting spot, and inspect beneath it for hidden dampness. Washable mats still need complete drying before reuse. The six-pack Hatching Time set is useful here because a clean mat can replace one that is drying.
How do you keep a brooder mat flat?
Remove it and check the base for dust or moisture. Cut it to fit the footprint without forcing a curl into a corner. Press the edges flat, and replace any liner that still slides or bunches underfoot.
When should you replace a liner or call a poultry veterinarian?
Replace a torn, brittle, curled, or permanently stained liner. If the floor is dry and secure yet a chick continues to struggle to stand or walk, watch for worsening signs and talk to a poultry veterinarian or extension office. This page addresses footing, not diagnosis.
Dedicated mat or cut-to-fit liner?
Choose a dedicated brooder mat when you want a quick fit and clean rotation. Choose the CVUTOVO silicone liner when a large or irregular base needs trimming. Duck EasyLiner Select Grip is a budget household alternative, though it demands careful cutting, flat placement, and frequent edge checks.
Raising Happy Chickens' “Bedding in the chick brooder: 5 alternatives on test” is useful for brainstorming materials. Treat those alternatives as practical ideas, then judge every option by the same quail-specific test: dry, flat, secure, washable or replaceable, and free of reachable adhesive.
When should you replace the liner?
Replace it when cleaning no longer removes moisture or residue, when the surface tears, or when an edge begins to curl. Disposable pads trade washing time for recurring replacement. They can suit a busy hatch, provided the pad stays flat and is changed before it becomes wet or loose.
Related guides
Frequently asked questions
Why are my quail chicks slipping on brooder floor?
Smooth plastic, damp bedding, or a loose liner usually causes slipping. Remove the slick layer and give the chicks a clean, dry, flat surface with texture. Penn State Extension warns against smooth brooder floors because young birds need secure footing while they learn to walk.
What is the safest temporary surface for quail chicks?
A clean, dry layer of paper towel can provide immediate traction while you prepare a washable mat. Replace it when wet or soiled, keep it flat, and check that chicks cannot pull it into folds. It is a short-term fix, not a reason to ignore a poor brooder base.
What is the best washable surface for quail chicks slipping on brooder floor?
A washable, textured mat fitted tightly over a solid base is the practical choice. Wash it with soap and water, rinse it, and dry it fully before reuse. The Hatching Time Brooder Floor Mat 6-Pack gives you six perforated polypropylene mats, so one can dry while another is in use.
Can a brooder mat replace the heat source?
No. A mat only provides flooring. Coturnix chicks need 95 °F / 35 °C at chick level in week one, with a cooler area available away from the heat. Reduce the temperature by about 5 °F per week later and move fully feathered chicks at 3–4 weeks.
Can I use shelf liner for quail chicks slipping on brooder floor?
You can use a non-adhesive shelf liner as a household alternative when it is cut neatly, laid flat, and kept dry. It is not purpose-built poultry equipment. Discard it if it curls, tears, exposes adhesive, traps moisture, or gives chicks less secure footing than the original surface.
When should I replace a brooder liner or call a poultry veterinarian?
Replace the liner when it stays damp, develops tears or curls, shifts underfoot, or cannot be cleaned fully. If a chick remains unable to stand or walk normally after you correct the floor, watch closely and talk to a poultry veterinarian or extension office rather than guessing at a diagnosis.