 Quail Corner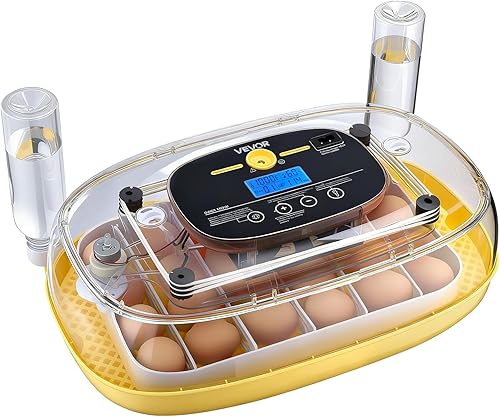
Best Budget
VEVOR 24 Egg Incubator, Automatic Egg Turner with LED Candler, Temperature & Humidity Control, 360 Degree View Clear Window, Auto Water Refill, Poultry Eggs Incubators for Hatching Chicks Ducks Goose Quail
$
Check Price on AmazonSet up a cheap incubator for quail eggs by confirming the quail tray, checking the display against an independent thermometer and hygrometer, and working out your temperature, humidity, turning, and lockdown routine before loading eggs. If you are still choosing a unit, start with our budget quail incubator picks. This is a careful coturnix setup, not a promise of a hatch.
Seven checks for a monitored coturnix hatch
A budget incubator prepared for a monitored coturnix hatch, with the tray, readings, water, turning, and brooder plan checked.
Read the manual, fit a tray that supports quail eggs, and run the empty incubator through its startup procedure. For forced-air coturnix units, work toward 99.5°F / 37.5°C and about 45% humidity on days 1–14. Still-air units use 101–102°F / 38.3–38.9°C measured at the egg top. Verify turning before the eggs go in.
Penn State Extension's incubation guidance puts setup and observation ahead of guesswork. The useful result is a machine you understand and can manage without lifting the lid every few minutes.
Start with the manual, a quail tray or rail, an independent calibrated thermometer and hygrometer, a clear way to add water, and a brooder plan. A chicken-egg capacity tells you nothing about quail capacity unless the listing or tray explicitly supports quail eggs.
$
Check Price on Amazon
$$
Check Price on AmazonWork through these seven checks in order. The first five prepare the machine and eggs; day 14–15 is the handoff to lockdown; the final check gives the chicks somewhere ready to go.
Read the manual before plugging in the unit. Find the quail tray or rail, independent thermometer and hygrometer, water route, and brooder plan. If the manual lists only chicken eggs, find explicit quail support before buying or loading it.
Check the lid seal, vents, tray, turner, sensor, power connection, and display. Put the incubator on a stable surface away from drafts, then follow the manual's startup procedure. Compare its display with the independent instruments before adding eggs. Make one considered adjustment instead of chasing every small difference between readings.
Identify the air type first. Forced-air coturnix incubation uses 99.5°F / 37.5°C. Still-air incubation uses 101–102°F / 38.3–38.9°C, measured at the egg top, so do not apply the forced-air target to a still-air machine. Use the coturnix settings schedule for the fuller day-by-day reference.
For days 1–14, use about 45% humidity; dry-hatch keepers may use 25–35%. Learn if your machine uses channels, a reservoir, a refill port, or the manual's own procedure. Check the water status through the window or refill route when possible. At lockdown, raise humidity to 65–70% and keep the lid shut.
Place the small eggs so they sit securely in the quail tray or rails. Watch a full turn before loading the batch and confirm that the chosen tray moves. An automatic label does not prove that the motor is moving the tray you fitted. Manual turning can follow 3–5 times per day. Automatic turning still needs a verified stop point at day 14–15.
If you want a feature-rich low-cost unit, the VEVOR 24 Egg Incubator listing includes automatic turning, integrated temperature and humidity monitoring, auto water refill, an LED candler, and 110V AC plus 12V battery input. Its listed chicken capacity is not a verified quail capacity, so confirm the tray fit first. Check the VEVOR listing
At day 14–15, stop turning and raise humidity to 65–70%. Watch through the window and keep the lid shut as much as possible. Coturnix incubation is usually 17–18 days, most pip within 24 hours of day 17, and stragglers can be allowed through day 19–20. No setting guarantees that every egg will hatch.
Have the brooder ready before hatch day, with its heat and water arrangements checked according to its own instructions. Keep this page focused on the incubator, then move chicks to their prepared destination. The CluckRun 12 Chicken or 30 Quail Eggs Incubator is a clearer fit for small eggs because its listing includes a dedicated 30-slot quail tray, automatic turning, and a built-in candler. It is a newer listing, so its rating is not a hatch-rate measure. Check the CluckRun listing
The best candler for quail eggs can help you monitor development without repeatedly opening the lid. Use it as a viewing aid, not as a reason to disturb the incubator.
Most cheap-incubator trouble starts before the eggs go in. Check fit, readings, location, water access, and turner behavior first, then write down your lockdown plan.
Start with the physical checks: tray fit, sensor position, air type, water route, and power. Compare readings calmly and change one part of the setup at a time instead of chasing every display change.
Confirm that you are using the forced-air or still-air target and that the still-air reading is taken at egg-top height. Recheck sensor placement and the manual's measurement method, then let the machine settle before making another adjustment.
Check that the quail tray or rails are seated correctly and that the motor is moving that tray. If the unit cannot turn the eggs securely, use manual turning 3–5 times per day until day 14–15, or stop and correct the tray problem before continuing.
Check the water channel, reservoir, refill port, and hygrometer placement. Use the same water method each time, keep the lid closed during checks, and switch to the lockdown range only at day 14–15.
For the wider process, browse our quail hatching guides. Once chicks leave the brooder, plan their next housing stage with your quail cage picks.
Start by confirming that the mini unit holds quail eggs securely. Set the forced-air or still-air temperature, use one consistent humidity method, and turn the eggs manually or automatically until day 14–15. Chicken slots do not prove that a unit has quail capacity.
Yes, provided the tray holds the eggs securely and you control the setup. For forced-air coturnix incubation, use 99.5°F / 37.5°C and plan for a 17–18-day incubation window. A low price still calls for careful monitoring.
No. You can turn by hand 3–5 times per day, or use an automatic turner to cut down on routine handling. Check either method and stop turning at day 14–15, then leave the eggs still through lockdown.
For coturnix, use about 45% on days 1–14; dry-hatch keepers may use 25–35%. Raise humidity to 65–70% from lockdown through hatch. Choose one water method and watch the actual unit instead of trusting a setting alone.
Coturnix eggs usually hatch in 17–18 days. Most pip within 24 hours of day 17, though you can allow stragglers through day 19–20. These figures are for coturnix, not button quail, which follow a different schedule.