 Quail Corner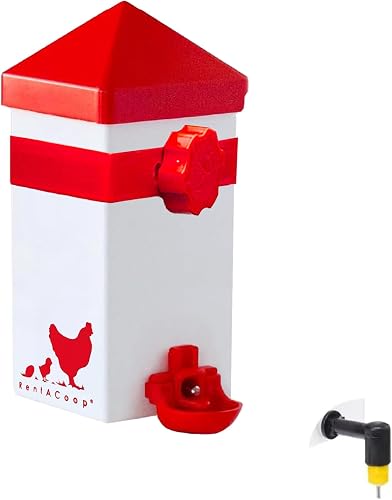
How to Set Up a Button Quail Waterer: Safe Steps (2026)
Set up a button quail waterer as a safety and observation job: give the birds a shallow, stable, visible drinking area, then watch their first drinks. This guide covers complete bottles, narrow-channel bases, chick dishes, mounting, cleaning, and leak checks without assuming a large chicken-style setup fits tiny button quail.
How to set up a button quail waterer
A four-step safety and observation routine
Step 1 Prepare
- Inspect the unit and enclosure
- Gather clean water and chick-safe materials
Step 2 Fill
- Assemble the correct parts
- Fill and check seams
Step 3 Place
- Mount or stabilize the waterer
- Keep it low, visible, and dry
Step 4 Verify
- Watch birds find the water
- Keep a backup during transitions
Result
A stable, visible water source your button quail can find safely.
Quick answer
Use the RentACoop 32oz Chicken Drinker with 2 Versatile Nipples as the default complete, mountable bottle. The Little Giant® Quail Waterer Base suits a compatible-jar setup, and the TGEYD Chick Feeder and Waterer Set is the chick-focused alternative. For more buying context, see our button quail waterer picks.
For chicks using an open dish, add clean marbles or pebbles, keep the floor solid or use ¼ in floor wire, and observe the first drinks. Assemble, fill, stabilize, and check the water path before leaving birds with it.
What you'll need
Choose one waterer route first. A complete bottle and a jar base do not contain the same parts.
- Complete option: The RentACoop includes its bottle, one vertical chick nipple, one horizontal adult nipple, dribble dish, sliding lid, and Coop Clip. The TGEYD is a feeder-and-waterer set with a listing-described anti-drown water base.
- Component option: The Little Giant base needs a compatible jar, which is sold separately.
- Water and safety materials: Clean drinking water plus clean, smooth marbles or pebbles for an open dish used by chicks.
- Placement: A stable, dry floor area or suitable cage wire or mesh mounting point.
- Transition backup: A second water source for supervised introduction to a nipple.
Our Top Picks

Best Budget
Little Giant® Quail Waterer Base - 1 Quart Screw On Base with Narrow Channel - Designed for Quail and Baby Poultry Chicks - Made in USA (Red, Pack of 1)
$
Check Price on Amazon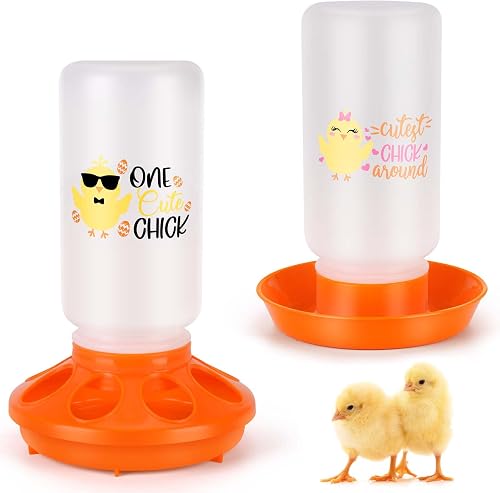
Best for Chicks
TGEYD Chick Feeder and Waterer Set – Automatic 1L Chicken Feeder and Waterer for Baby Chicks, Ducks, and Quail – Brooder Starter Kit & Chicken Coop Accessories
$$
Check Price on AmazonStep-by-step
Inspect first, fill second, stabilize the unit, then watch the birds use it. That order catches a bad seal or blocked outlet before it becomes a bird problem.
Step 1: Inspect the waterer and enclosure
Check the tray or dish, threads, gasket, nipple, lid, clips, and jar fit before adding water. Look for sharp edges, cracked plastic, loose parts, or a blocked drinking path. If you are using the Little Giant, make sure the compatible jar seats correctly before trusting the base.
For chicks, use ¼ in floor wire or a solid floor. Clean marbles or pebbles in an open water dish can reduce the danger of a chick falling into standing water, though you still need to supervise the arrangement. The Happy Chicken Coop gives the same practical warning about young quail and deep water.
Step 2: Assemble the correct parts and fill slowly
Pair the Little Giant base with its compatible jar, or assemble the complete RentACoop or TGEYD unit according to its listing instructions. Fill with clean water, close or invert it as designed, and inspect the tray and seams before placing it with the birds.
If you want a complete mountable bottle, the RentACoop is the straightforward choice. If you already have a suitable jar and want a narrow-channel base, the Little Giant is the simpler component route. See the complete bottle option
Raining Quail Alaska's brooder-waterer instructions also test the water path before access. Do the same here, even with a store-bought unit.
Step 3: Stabilize or mount it low and visible
Place a free-standing base on a stable floor, or use the supplied clip or a suitable cage mount where it fits. Keep the drinking area visible and accessible without pushing birds into a corner. Keep the reservoir out of the bedding so a tip or leak does not create a wet patch.
Button-quail housing is floor-first rather than height-first, and these birds boink. Read our button quail cage picks for floor-first housing and soft or low roof ideas that also affect waterer stability. Re-check the position after birds move around the enclosure.
Step 4: Supervise first access and nipple changes
Watch the birds locate the drinking area, then confirm the water level changes and the tray stays clean. If birds ignore a nipple, return to a familiar backup source while you supervise the transition. Do not assume every button quail has learned the new drinking system.
For broader chick-waterer context, see our quail chick waterer guide. The goal here is simple: every bird must be able to find and use a clean source.
How often should you check a button quail waterer?
Inspect the waterer every day and clean it whenever the drinking area is fouled or bedding becomes wet. Indoor button-quail keeping calls for daily spot-cleaning, so include the waterer, its seal, its drinking path, and the surrounding floor in that routine.
Follow the product care instructions, rinse away residue, and return only a clean, stable unit. A covered reservoir can hide a problem. A visible water level, accessible tray, and dry bedding make checks easier, while the related feeder-capacity guide explains why unobstructed access matters without supplying a waterer ratio.
Common mistakes
Most setup problems show up as unsafe access, wet bedding, or a part that was never meant to be a complete unit.
- Deep open dish: Use a chick-appropriate shallow access arrangement with clean marbles or pebbles. No setup makes drowning impossible.
- Waterer tips or sits in litter: Move it to a stable, visible floor position or use an appropriate cage mount.
- Threads leak after assembly: Stop access, inspect the seal and threads, re-seat parts without forcing them, and test again away from birds.
- Birds ignore the nipple: Keep a backup source and supervise the transition instead of assuming the birds learned it.
- Tray is clean but the enclosure is wet: Check the seal, mounting angle, dribble path, and bedding contact.
- Component mistaken for a complete unit: Remember that the Little Giant base requires a compatible jar and that inclusions vary by listing.
Troubleshooting
Remove a faulty waterer from bird access first, then test the parts away from the enclosure before putting it back.
The waterer is leaking
Remove it from access and check the lid, gasket, threads, and inversion or closure. Refill and test it away from birds. Replace a damaged part or use the backup source instead of leaving wet bedding in place.
The tray is empty but the reservoir is full
Check that the nipple or outlet is not blocked and that the unit is oriented as directed. Clean the drinking path and test again without birds present. Do not rely on a claimed flow rate.
Button quail will not approach it
Make the water visible and keep the placement stable. Return to a familiar backup source while observing. If a bird appears unwell or is not drinking, watch for signs and talk to a vet or extension office.
Chicks can reach the water but stand in it
Rework the chick-safe dish arrangement with clean marbles or pebbles. Check that the floor is solid or uses ¼ in wire, then supervise access again.
Frequently asked questions
What is the best waterer for button quail?
The RentACoop 32oz Chicken Drinker with 2 Versatile Nipples is the default complete-unit pick. It offers a manageable bottle, visible drinking options, and cage mounting. Choose a waterer with a manageable scale, visible water, and a safe drinking area, not the biggest reservoir.
What waterer should I use for button quail chicks?
The TGEYD Chick Feeder and Waterer Set is a chick-focused option, while the Little Giant narrow-channel base is another route. For an open dish, add clean marbles or pebbles and supervise access. Use ¼ in floor wire or a solid floor for tiny chicks.
Can button quail use a nipple waterer?
They can use one after learning where the water comes from, provided you verify that every bird drinks. Watch the first access and keep a backup source during the transition. A nipple is not automatically the safest choice for every button quail.
Can I use a mason jar for a button quail waterer?
The verified Little Giant Quail Waterer Base pairs with a compatible jar, and the jar is sold separately. Check the listing compatibility instead of assuming every mason jar fits. The jar and base also need a stable position and a usable drinking channel.
Do button quail need a large waterer?
No. Choose a stable, appropriately scaled unit that is easy to inspect and clean. Button-quail adults weigh 1.5–2 oz, so a large poultry reservoir is not automatically a better match. Refill needs depend on the setup, so do not plan around a fixed number of days.
How often should I clean a button quail waterer?
Inspect it every day and clean it whenever the drinking area is fouled or bedding becomes wet. Indoor button-quail housing needs daily spot-cleaning, and the waterer belongs in that check. Follow the product care instructions, rinse residue away, and return a clean, stable unit.